Keyboard and Composer

Requires a Wolfram Notebook System
Interact on desktop, mobile and cloud with the free Wolfram Player or other Wolfram Language products.
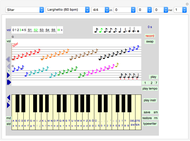
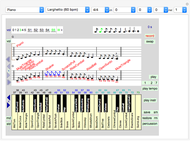
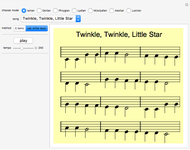
Compose music by writing notes on the staff or by clicking the keys of the simulated MIDI keyboard (with 97 keys, i.e., 8 octaves), playing 128 non-percussion instruments and 60 percussion instruments.
[more]
Contributed by: Karl Scherer (September 2009)
Open content licensed under CC BY-NC-SA
Snapshots


Details
Introduction:
This Demonstration does not create MIDI files since Demonstrations are not allowed to export or write files to the hard drive.
(If you are a Mathematica user and can therefore run the source code, then you can uncomment two lines in the source code to store and restore the scores as .txt files. Exporting the score as MIDI file .mid is then similarly simple; search the program for "midi".)
In the following we will use the term "instrument" as an abbreviation for "non-percussion instrument" (also called "style"). The keyboard can be used to play 128 instruments and 60 percussion sounds.
The "instrument" button at the lower right switches the keyboard between non-percussion mode, percussion mode, and "typewriter".
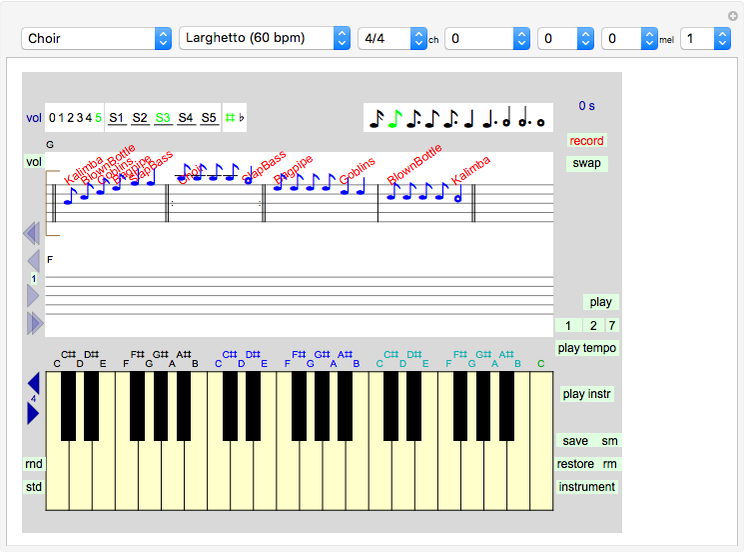
Special keyboard setup: During the "instrument" mode you can click the "rnd" button to randomly assign 12 different instruments to the keyboard (one for each note of an octave). The attached melody S3 was created that way. Each click on "rnd" creates a new random assignment. Click "std" to go back to the standard setup, namely each keyboard key playing the same instrument.
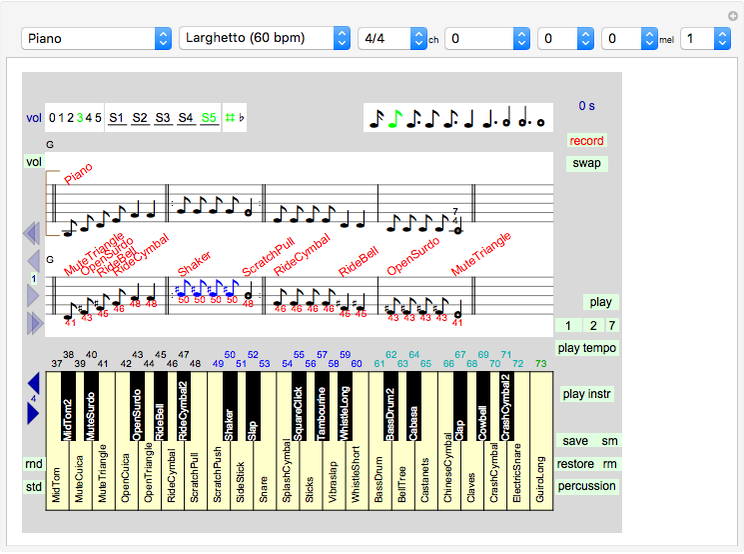
Hitting the "instrument" button will turn its text to "percussion", and each key will trigger a different percussion sound. The names of the percussion sounds are written on the keys, in alphabetical order.
In "typewriter" mode you are presented with a simple typewriter keyboard. If recording is switched on, you can add song text to existing notes (recommended: not more than three letters per entry). For more text, insert as many yellow filler bars as you need. First type (part of) a word, then hit Enter. The word will be shown above the keyboard, and after you hit Enter it will appear below the selected note. The typewriter mode is sensitive to whether you selected Insert or Overwrite mode. There is also a Delete option which erases all song texts from the selected notes.
Use the dropdown menus to select an instrument and a tempo. The tempo dropdown menu shows the names of the tempos and their number of beats per minute (bpm). One full note lasts four beats. Since the tempo can change during a score, there is an option to write (while in edit/record mode) the tempo (in beats per minute) into the score: simply click the "tmp" button at the left border. This has been used in melodies mel6 and mel7 (main and bass score of "Für Elise" by Beethoven) which is included in this Demonstration. In this piece the beat changes midway for a while.
The third dropdown menu shows the available rhythms (in beats per bar); clicking the button "rhy" will enter this information into the score. In this Demonstration the rhythm selection does not affect how the score is played; it is informational only. The system does not check whether the score actually keeps the rhythm.
Hit the "record" button to record your keystrokes, to display them on the staff, and to enter edit mode. In edit mode you can also write notes into the score (details below).
At the top right you can select the "type" of a note that is displayed when you strike a key: 1/32, 1/16, 3/32, 1/8, 3/16, 1/4, 3/8, 1/2, 3/4, and 1/1 (full note). This timing also effects the percussion sounds. They can also be used to edit the score: if one or more score notes are selected by the marker bracket(s), they will change to a quarter-note when you hit the quarter-note button.
The volume buttons "0" (silent), "1" (pianissimo), "2" (piano), "3" (normal), "4" (forte) , and "5" (fortissimo) control the loudness of the keyboard. Notes with volume 0 are pauses (more details further down).
You can transpose the keyboard by several octaves up and down by clicking the lower triangular buttons. The number between the triangles shows the current octave at the left side of the keyboard.
The name of the last played note (and its key number between 1 and 97) is displayed in the center above the keyboard.
The two staffs carry two independent scores. Most features only relate to the top staff. Only the top score can be edited and stored. Use the "swap" button to swap the two scores. You can play both scores together by hitting the "2" button below the "play" button. You can play both scores together with the five stored scores (S1,...,S5) by hitting the "7" button. Hence your music score can have up to seven voices, each with their own styles and chords (as long as the total number of styles used is 15 or less; the number of percussion instruments used is not limited). You have two brackets available to limit the playing or editing to a selection of entries (details below).
Display of Recorded Notes:
Both staffs can display the score in standard format (G clef) or treble format (F clef; also called bass clef). To switch from one to the other simply click the letter G (or F) at the top left of a staff.
The length of the composed and recorded music score is not limited; up to 31 entries (notes, bars, ...) are visible at a time.
The system uses colored notes to display notes, one color per octave. The colors are red, orange, brown, black, blue, aqua, green, magenta.
Click "#" or "♭" to choose whether the half-notes are displayed as sharps or as flats.
Percussion sounds have numbers (which are displayed in red below the note). There are 96 keys on the eight octaves, but only 60 sounds, hence key 61 creates the same sound as key 1. With percussion sounds the displayed note symbol and its color do not indicate pitch, but rather (like the number displayed) indicate which keyboard key created the percussion sound.
Writing Notes:
When in record/edit mode you can create notes by clicking a staff position inside the left bracket. Only notes from C4 to B5 (bass clef: E2 to D4) can be created this way. You can overwrite a note or insert a note (click overwrite/insert button). To create sharps and flats, use the up and down arrows.
Chord controls:
Over 4000 chords are available as duplets, triplets, or quadruples. In a chord, one, two, or three notes of the same duration are added to the selected note. Click the chord dropdown menus to determine which additional note(s) you want.
The numbers count pitch differences in half-tones; these numbers are displayed above the note. Example: selecting chord {4,7} for the struck (or written) note G creates the harmonic triple {G,B,D}. The three notes are played at the same time and for the same duration. B is four half-tones up from G, and D is seven half-tones up from G. Chord {-5,4} plays {D,G,B} with D being below G, and {-8,-5} plays {B,D,G}, with G now being the top note.
For often used chords like Gmajor, {G,B,D}, a much faster input is now available: simply select "X-maj" from the first chord drop-down menu. This sets the first menu to "4", the second menu to "7", and the third menu to "0". Now you can play "G" or click the staff at the "G" note to create and hear the chord Gmajor.
When you hit the keyboard or click the staff during recording, the additional notes are automatically added and played.
In record/edit mode, hit the "chords" button to apply the chord to all selected notes.
Recording and Editing:
While most buttons do what you expect them to do, many shortcuts and additional features have been implemented for speed of editing.
Therefore, please read the following explanations carefully to understand all the tools of this composer.
Hitting the "record" button will turn it into a "stop" button, and will make a few more buttons visible that are designed for editing the music score. The effect of (most of) these buttons depends on where the edit markers are positioned.
For each keystroke, the system stores the pitch, the note type, the tempo, the volume, the instrument (or type of percussion), and the chord.
When recording, these parameters can be set differently for each note.
The "overwrite/insert" button affects the keyboard input, the insertion of special score entries (bar, filler, and double bar), and the "paste" button (for details, see below).
Multifunctional Buttons:
"text", "chord", "↑", "↓", "⟷", "↕", "mix", "erase", "keep", "=", "-" (flatline), "copy", "*2", (play) "1", "2", "7", "play tempo", "save tempo", "play instr", "save instr", "conv", and all note types.
Each of these buttons works in the following three ways (details further down):
• If the recording is switched off, any (non-edit) button relates to the whole score (i.e., to each note).
• If only a single edit marker (square opening bracket) is active, then the marker is brown and the buttons relate to all notes to the right of the bracket.
• If both edit markers are active, then the markers are green and the buttons relate to all the notes between the green brackets.
The second bracket (which is a square-closing bracket) can be switched on and off by clicking the top of the score sheet (i.e., between the "vol" button and the "swap" button). To move the second bracket switch it off and recreate it somewhere else. The two markers make editing very easy.
The buttons "vol", "#", "♭", "swap", "play", save", "sm" (save melody), "restore", and "rm" always apply to the complete score.
The score-editing buttons in detail:
Volume options "0", "1", "2", "3", "4", "5": If more than one note is selected, you can set the volume for these notes from 1 to 5, whereby pauses (notes with volume 0) are not affected. If only one note is selected you can set the volume from 0 to 5 and thereby create and edit pauses. A pause has a red letter "x" beneath it which marks it as silent.
The "vol" button writes each note's volume into the score of both staffs. Click it again to undo this option.
The "text" button writes the name of the playing instrument into the score for all selected notes. The "text" button also works for percussion. Click it again to undo this option.
The up button "↑" increases the pitch of the currently selected note(s) by half a tone; the down button "↓" decreases the pitch.
The reverse button "⟷" reverses the selected score; the last note will be the first and vice versa.
The flip button "↕" flips the selected score upside down. Note C5 stays unchanged.
Click the bar button to insert a black bar into the music score.
Click the number "2" above the bar button to display at each bar the bar number and the time passed up to this bar. Multiple bars get only one number. Click again to erase the number and time display. The time display at each bar makes it very easy to synchronize voices.
Click the button with a yellow vertical line to insert a filler into the music score. It can be used to align the bars of multiple scores. If you click the top staff to the right of the end of the score, then the space between the score and the marker will be filled with yellow fillers.
Click the double bar button "||" to insert a double bar into the music score. Double bars are used at the beginning and end of major score parts.
Repetition bars: A pair of double bars with colons (first to the right, then to the left: ||: ... :|| ) causes the section in between to be played twice. There are no nested repetitions. When playing the score the system always assumes that the sequence of repetition bars always is "open, close, open, close, …"; hence ||:....||: is treated as ||: ... :||.
Notes held across a bar: In your score, click a bar that has two notes of same pitch on both sides (notes A and B, say). Now click the arc button below the bar button. This will add a small arc below the selected bar in the score. This arc means that note A is held (i.e., lasts) for the combined length of A and B. The right note will not be played at all. The system will not check that A and B are of same pitch, but assumes they are equal. Click the arc button again to get rid of the arc.
The "mix" button creates a random permutation of the selected entries.
The "erase" button will erase all selected entries. The "keep" button will erase all entries apart from the selected ones.
Clicking "=" forces all selected notes to use the same instrument as the first note in the selection. This is also true for percussion. This makes it extremely easy to create a percussion score from a given melody. (Example: click "S5", "restore", "record", "instrument", erase the second bracket by clicking above it, click the first note, hit the keyboard somewhere, click the first note again, then "=", and "play".)
The flatline button "-" copies the first note of the selected interval to all other notes in this interval.
The "copy" button copies the selected entries to memory, to be used by the "paste" command.
In insert mode the "paste" button inserts the memorized copy at the position given by the left bracket. All entries to the right of this bracket will shift to the right. In overwrite mode the copy replaces the selected entries.
The duplicate button "*2" inserts a copy of the selected part at the end of the selected part.
The button "play" always plays the whole of the top score unrestricted by the edit brackets. As with all play buttons in this composer, sometimes you can produce the best sound only with the second click on the button. (To avoid this problem, insert a silent quarter-note at the start; see hints further down). Hitting "play" creates the same result as hitting "1" when recording is switched off.
The "1" button plays the selected note(s). In edit mode (recording) you can restrict the playing to part of the score. This is also true for the other four playing buttons.
The "2" button plays the scores on both staffs together. Switch recording off to ignore the edit markers and play the full scores.
The "7" button plays the scores on both staffs and the (up to) five stored scores in the stored scores S1, …, S5, all at the same time. Switch recording off to ignore the edit markers and play the full scores.
The play buttons only play any score as long as the top staff has content. If the second voice or others stored voices have a longer score than the score on the top staff, you have to add yellow padding entries to the top score to hear the full multi-voice score, or you can simply place the longest score into the top staff.
The "play tempo" button replays the selected notes with the tempo given by the "tempo" menu.
Once you found a better tempo while playing with the "play tempo" feature, you can then store the new tempo for the selected notes in the temporary storage with "apply tempo". Then press "save" to save to permanent storage Sx. If you change the tempo in the middle of a score, it is strongly recommended to mark this by inserting the name of the new tempo into the score (click the "tmp" button).
Similarly, the "play instr" button replays the selected notes as if played on the keyboard with a newly selected instrument, and you can store the selected notes with the new instrument to temporary storage with the "apply instr" button. Percussion entries will stay unchanged. Press "save" to save the score to temporary storage Sx. If the keyboard is randomized (button "rnd" is red), then this random keyboard will be used for playing and storing, which can create some surprising effects.
You can hit the play buttons at any time during recording.
Once you have played a series of notes with any of the play buttons, the duration of the played part is shown (in seconds) in the top-right corner.
Underneath (only in edit mode) the size of the score is shown, also (in brackets) the position in the score to be edited next. The location of this position is indicated by the left edit marker during recording. To edit any score position simply click it at the desired position; the left edit marker will move there. The system will play the selected note as audio-feedback.
Hitting the "conv" button converts (if "instrument" was selected) the selected score notes into instrument notes. The non-percussion instrument selection is always stored invisibly with each percussion entry. Hence this conversion resurrects (!) the instrument stored when the score entry was created, and it ignores the current instrument menu selection. (To apply the current instrument menu selection, see the "play instr" and "apply instr" buttons.)
Clicking "instrument" brings up the "percussion" button, and hitting "conv" now will convert the selected instrument note(s) into percussion notes.
Paging:
(Please note the paging options have been changed and improved!) If your score is longer than one page:
• click the triangular buttons to page forwards and backwards,
• click the page number positioned between the triangular buttons to go to the beginning or end of the score: click slightly to the left of the number to page to the beginning; click slightly to the right of the number to page to the end.
• click the double arrows to page forwards and backwards ten pages.
Once you have finished editing and are happy with your melody you can store it with the "store" button in one of the temporary storage locations marked "S1", …,"S5". All storage locations already contain melodies, and you can change them as you like. The currently selected storage Sx is colored green. Nonempty storage locations are underscored. You recall the content of the highlighted storage location by hitting "restore". The buttons "sm" and "rm" store the top score to (and restore it from) one of the fifty melody storage locations that you can select from the seventh dropdown menu. That way you can create a library of your own compositions. Initially the melodies 1 to 5 are identical to the scores in S1, …,S5.
Restoring a melody will reset the instrument selection, the tempo selection, the rhythm selection, and the volume selection.
Restrictions and non-standard notations:
1. Even though there are no 1/64 notes, you can easily create very fast notes by selecting a fast tempo for this single note or for the score in general. Remember that the tempo is stored separately with each note. If you generally record with moderato, for example, and you set the tempo to presto for some notes, these notes will play twice as fast compared to what their notation indicates; hence a 1/32 note on the staff will be played as a 1/64 note!
2. Due to technical limitations (the Mathematica program is not compiled, but interpreted) you cannot key in notes very quickly. Notes are stored with the duration associated with the note type (e.g., quarter notes last one second with the 60 bpm tempo Larghetto), and will play back independently of how fast you keyed them in.
3. There are no sharp or flat symbols at the start of the score. Sharps and flats are marked for each note. The system does not store what "key" (such as A flat) the melody is written in. If you wish to indicate the key you can display a silent note at the start of the score.
4. Pauses are displayed as (silent) notes with a red character "x" beneath them. Characters for musical pauses are missing in Mathematica. For technical reasons it is recommended that you start your score with a quarter pause.
5. The eight highest and eight lowest notes do not take chords. Do not use the down button "↓" on chorded notes with extremely low key numbers (<10). Do not use the up button "↑" on chorded notes with extremely high key numbers (>87).
6. The sum of all scores played at once can contain at most 15 instruments plus any number of percussion instruments. Note that this limit applies even when the instruments play after each other!
Hints:
Since the computer has to work hard when one of the "play" buttons has been pressed (especially when playing fast scores or many voices), it is strongly recommended to start each score with a silent quarter note (pause). This avoids any crackling sounds that can otherwise occur at the start.
If you want to change the volume setting without affecting the score, you could switch off the recording, change the volume setting, then switch the recording on again. An alternative and faster way is to place the edit marker on a bar and then change the volume. This "bar-trick" also works for changing the note type.
If you want to play the full score with "2" or "7" without leaving the edit mode, you could click the first note, then go to the last note and put the closing bracket there. For long scores this can be inconvenient. A much faster option is to move the opening bracket to the start by clicking the first note, then deactivate the closing bracket by clicking near the top of the score sheet.
If only one note is selected and enclosed by two brackets, then any edit operations on the note will cause the brackets to automatically move one step to the right so that you can edit the next note. Sometimes (e.g., when you want to use the "up" arrow several times) it is desirable that the brackets stay where they are. This can be achieved by inserting, if necessary, a (yellow or other) bar next to the note and then including the bar in the brackets. Now the brackets will stay put during any editing. (Remember, however, that volume=0 can be set or unset only when the note alone is enclosed by the brackets.)
Exercise:
Click "S2", "restore", "swap", "S1", "restore", then "play" or "2" and hear what happens.
To play "Für Elise" by Beethoven, select "mel 7", "rm", "swap", "mel 6", "rm", (play) "2".
Melody 8 is a humorous experimental piece by the author, created simply by joining two mixed, fast versions of melody 5.
Permanent Citation
"Keyboard and Composer"
http://demonstrations.wolfram.com/KeyboardAndComposer/
Wolfram Demonstrations Project
Published: September 11 2009
 Accidentals, on Purpose
John Kiehl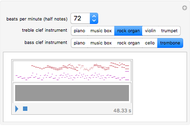 Simple Manipulation of Pachelbel's Canon in D
Kaetlin Taylor and Michael Todd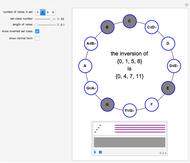 The 29 Tetrachords and Other Set Classes
Marc Brodie (Wheeling Jesuit University)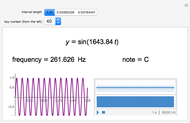 Sine Waves for Musical Scales
Eryn Stehr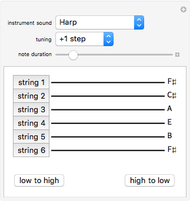 Guitar Tuner
Peter Falloon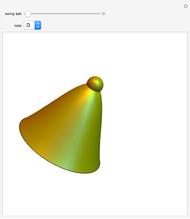 Jingle Bell Surface
Jeff Bryant Musical Interval (Relative Pitch) Test
Jake Foster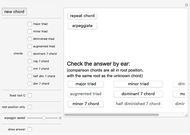 Recognizing Chords
Marc Brodie (Wheeling Jesuit University)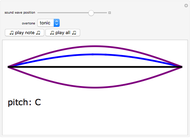 Overtones
Helen Papadopoulos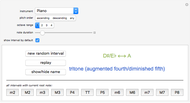 Musical Interval Recognition
Peter Falloon
-
 Polyhedral Playground
Karl Scherer -
 Tiling Constructor, Tile-Dragging Variant
Karl Scherer -
 The Catenax Puzzle
Karl Scherer -
 Angel Puzzle
Karl Scherer -
 Constructing and Manipulating Graphs
Karl Scherer -
 3D Construction Set
Karl Scherer -
 Blended Quadrilaterals
Karl Scherer -
 Rotating Polyhedra in Space
Karl Scherer -
 The Misdirection Game
Karl Scherer -
 Tensegrity
Karl Scherer -
 Nowhere-Neat Tilings
Karl Scherer -
 Pocket Calculator
Karl Scherer -
 Area Puzzle
Karl Scherer -
 Molecule Construction Set
Karl Scherer -
 The Ray Puzzle
Karl Scherer -
 Animated Model of an Industrial Robot Arm
Karl Scherer -
 Model of an Industrial Robot Arm
Karl Scherer -
 Color-Blended Circular Tiles
Karl Scherer -
 Rep-Tiles
Karl Scherer -
 Armed Balloons Puzzle
Karl Scherer